START HERE / TASK 01
Your guide to Macarius
Use the cashier chapters for everyday selling. Administrators should also work through setup, permissions, backups and integrations.
- This guide describes the Windows Retail edition, version 2026.11.4.0. The separate Takeaway edition has different workflows and its own setup guide.
- Bold button names match the app where verified. Available tools depend on your staff role, configuration and installed version.
- Screenshots use training examples. The updated home screen is shown with sample data; some unchanged workflow screens were captured in an earlier build.
- Keep the one-page Quick start beside the till. The accompanying Help hub provides this full guide, search, downloads and a captioned walkthrough.
Never write staff PINs, signing keys, backup passphrases or payment credentials in this guide. For support, include your shop name, app version and the exact error - not a password.
SETUP / TASK 02
Install, update and arrange a licence
- On a supported Windows 10/11 64-bit computer, install Macarius Retail POS from its official Microsoft Store listing. Use your usual Windows account for your shop.
- If moving from an older installation, back up the shop and close the old POS first. Review the Store launcher's migration prompt before consenting to a copy. Original files are retained.
- Open the app from Windows Start. Eligible devices can begin a 30-day trial through the online licence service. Reinstalling does not restart the trial.
- Before the trial expires, request a Macarius licence and agree the price and period with Macarius. Access can be enabled remotely after approval; the current workflow does not require an activation code.
Downloading the app does not start an automatic subscription charge. Existing permanent offline licences remain separate from future cloud subscriptions. Keep a backup before migrating or reinstalling.
SETUP / TASK 03
Set up your shop before trading
- Complete the first-run business registration: shop name, owner/contact information, address and the email you want associated with the shop.
- Add your shop logo if available. Check the registered shop details used on receipts, quotes and reports.
- Create your local administrator PIN and keep it private. Add individual staff accounts with only the permissions each person needs.
- Check the store currency and tax configuration. Product VAT fields labelled reference-only are not a substitute for checking the till's actual tax calculation.
- You can start with an empty catalogue and add categories and products later. Set up the printer, scanner, drawer and any card connection, then test the equipment before trading.
The app cannot confirm that your physical printer, cash drawer or payment terminal works just because a setting was saved. Check the actual device output.
CASHIER / TASK 04
Sign in and navigate
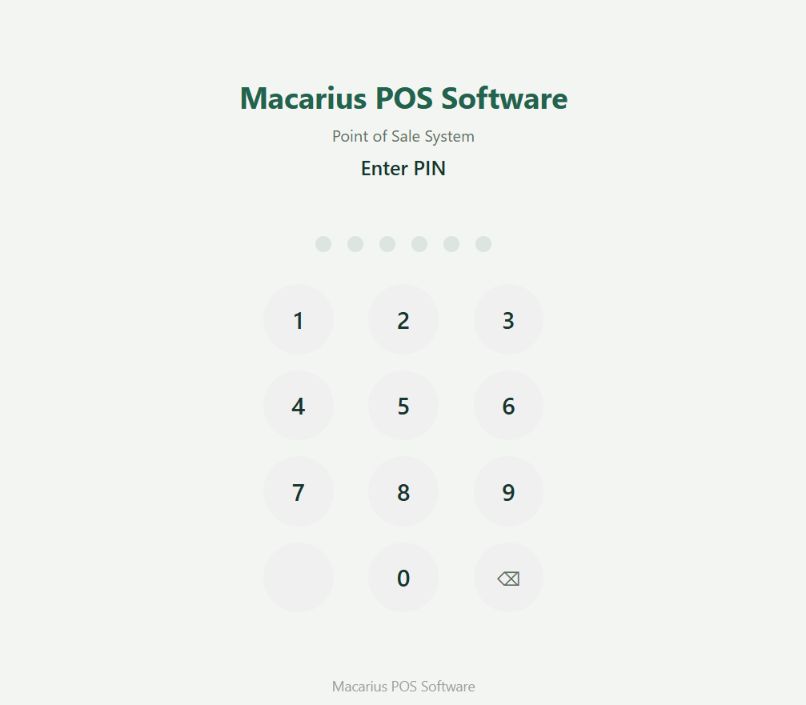
Sample data; unchanged workflows may show an earlier visual style.
- Open Macarius and enter your assigned staff PIN. Use the keypad backspace if you make a mistake.
- Home & checkout is the main selling screen. The left menu gives access to searching, quotes, history and management tools.
- Use Layout & display settings to adjust your view. Administrators can also arrange actions and edit fixed-price extras there.
- Use Logout when another member of staff takes over. Exit closes the app. If a basket is active, follow the prompt to hold it; finish or cancel an active payment first.
Use your own account so activity is attributable to the right person. The absence of a management menu may be a permission restriction, not a fault.
CASHIER / TASK 05
Know your checkout screen
Sample data; unchanged workflows may show an earlier visual style.
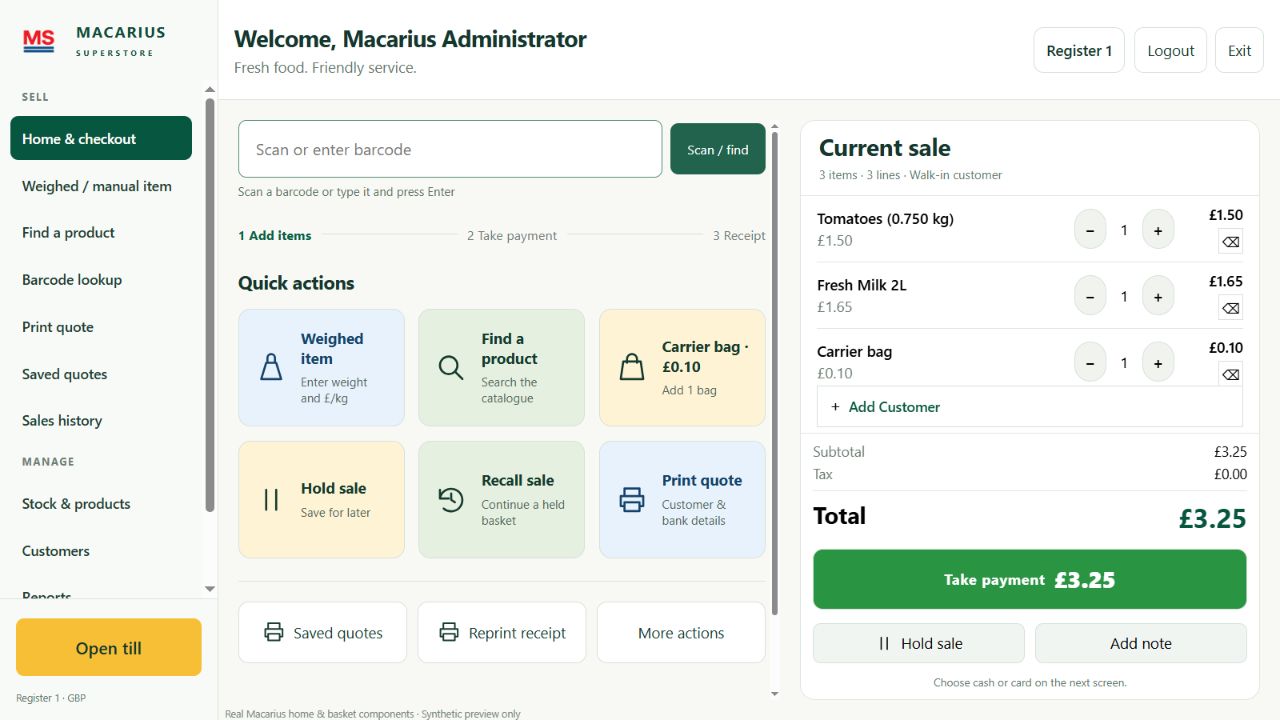
- The barcode field is at the top. Scan an item, or enter its barcode and choose Scan / find.
- The recommended six actions are Weighed item, Find a product, Carrier bag, Hold sale, Recall sale and Print quote. An administrator's saved arrangement may differ.
- More actions reveals additional configured tools. Browse product catalogue expands the optional catalogue without crowding everyday checkout.
- Current sale stays on the right on a wide display. Review quantities, line prices and the total, then use Take payment.
- Long baskets scroll inside the item list. The total and payment control stay visible. Resize text or use compact spacing through Settings.
The screenshot is a preview of the real home and basket components using sample data.
CASHIER / TASK 06
Make your first sale
- Make sure you are on the correct empty basket. Scan a product or choose Find a product and select the exact item.
- Check that its name, price and quantity appear in Current sale. Repeat for the customer's remaining items.
- Add weighed items, bags or other approved extras as needed. Attach a customer if required for the sale or loyalty workflow.
- Review the basket and total with the customer. Correct mistakes before opening payment.
- Choose Take payment and use the appropriate cash, configured card or split-payment workflow. Complete the sale only after the money or terminal approval is confirmed.
- Offer a receipt. Confirm the next basket is ready before serving the next customer.
A scanner beep is not proof that an item was added. Always check the basket. Holding a basket or saving a quote does not mark it paid.
CASHIER / TASK 07
Find products and handle unknown barcodes
Sample data; unchanged workflows may show an earlier visual style.
- Click Scan or enter barcode before scanning. The scanner should behave like a keyboard and normally send Enter after the code.
- If you need a name search, choose Find a product. Use the exact variant barcode where an item has multiple options.
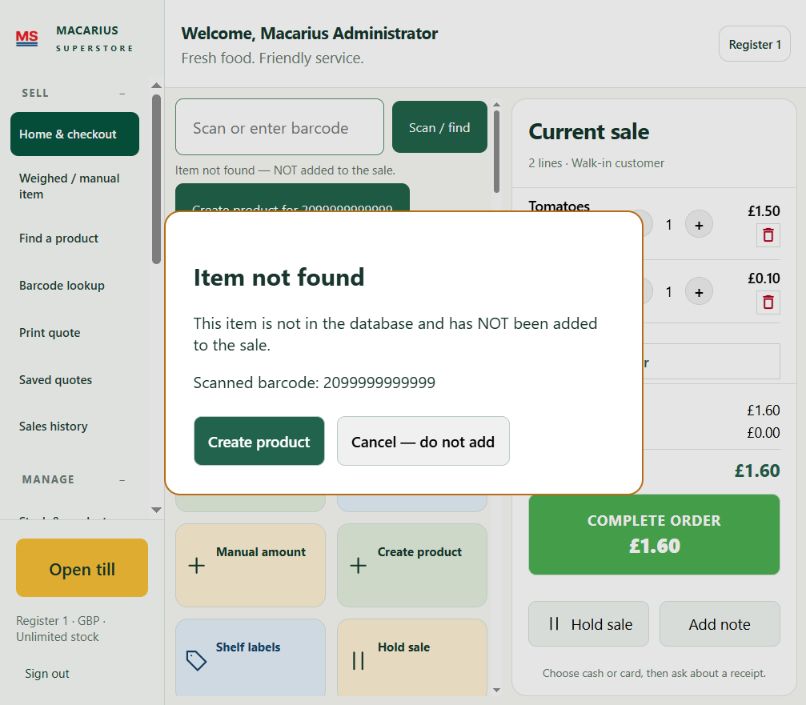
- Read Item not found carefully: the unknown item has not been added or charged.
- If authorised, choose Create product, complete the product details and use Save and add to sale where offered. Otherwise cancel and ask a manager.
- Check the new basket line before continuing. Do not substitute a different product simply to bypass a missing barcode.
Receipt and saved-quote barcodes can retrieve their associated records. Match the retrieved record before reprinting or changing its status.
CASHIER / TASK 08
Weighed items and manual amounts
Sample data; unchanged workflows may show an earlier visual style.
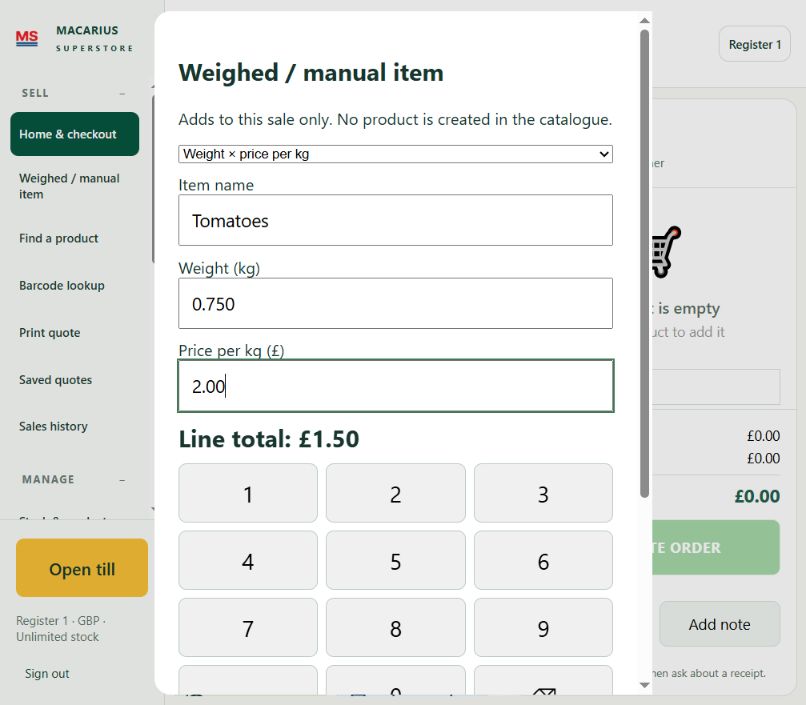
- Choose Weighed item or Weighed / manual item. Enter a clear item name.
- Enter Weight (kg) and Price per kg (£). Use 0.750 for 750 grams. For example, 0.750 kg at £2.00 per kg gives £1.50.
- Review Line total, then choose Add to sale. Scroll inside the form if its lower controls are not visible.
- For an approved fixed price, choose Manual amount or Fixed amount instead. Enter the amount and check the basket line afterwards.
Use the measured weight from your scale. This workflow does not imply an integrated certified scale. A manual sale item does not create a tracked catalogue product.
CASHIER / TASK 09
Quantities, customers and notes
- Use + or - beside a basket line to adjust its quantity. A decrease at the lowest quantity may remove the line; the bin also removes it.
- Check the line total and overall total after each correction. The item count and line count are different when a product has quantity greater than one.
- Choose Add Customer and select the correct customer record. Confirm the name/email before using customer-specific balances or loyalty.
- Use Add note for a useful sale note. Do not record card numbers, security codes or sensitive identity documents.
- If you have opened payment, cancel or finish that payment before making changes that the app blocks.
Removing a basket line is not a refund of a completed payment. Completed sales must be reviewed through the proper history/returns workflow.
PAYMENTS / TASK 10
Take cash and give change
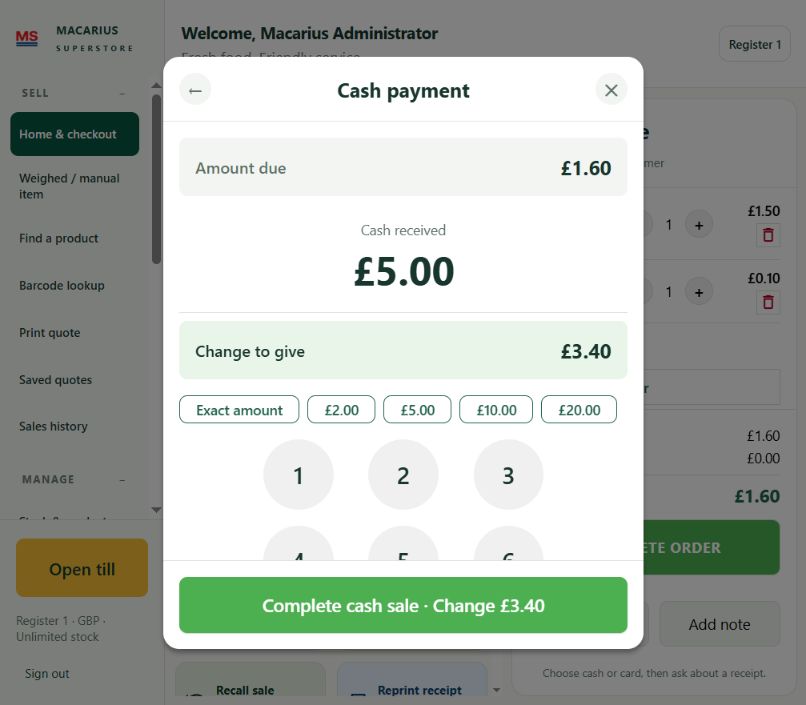
Sample data; unchanged workflows may show an earlier visual style.
- Review the sale total, choose Take payment and select Cash.
- Choose Enter cash received. Select an offered amount or enter the actual money handed over.
- Use Exact amount only when the customer gives the exact total. If Still to pay is shown, correct the amount before completing.
- Check Cash received and Change to give. For a £1.60 sale with £5.00 received, the change is £3.40.
- Once you have the money, choose Complete cash sale once. Give the displayed change and offer a receipt.
If printing fails after completion, do not make another sale to print a receipt. Find the saved sale and reprint it.
PAYMENTS / TASK 11
Card and split payments
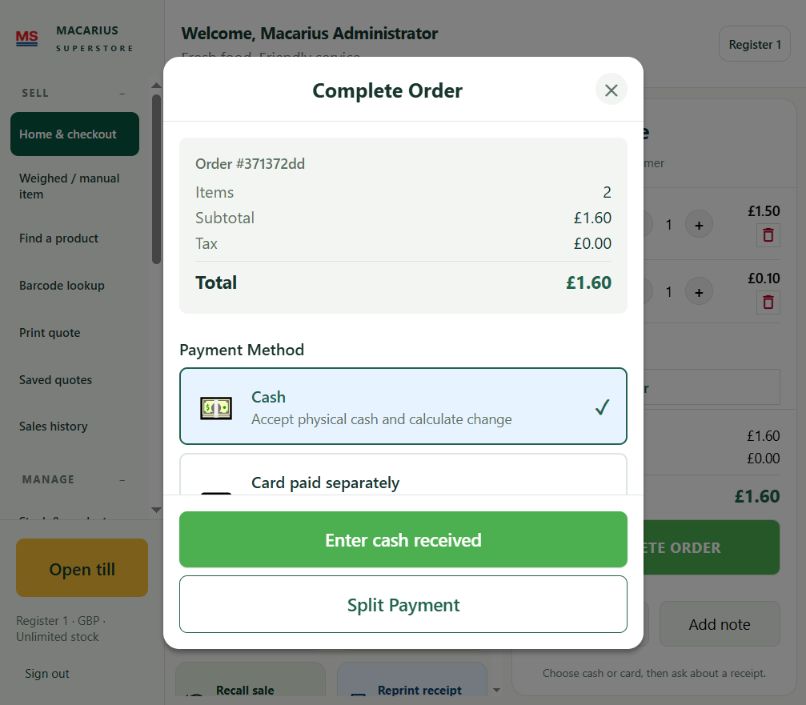
Sample data; unchanged workflows may show an earlier visual style.
- Check the configured payment mode through Devices & owner tools / card configuration. The available flow depends on the provider and completed setup.
- For a separate terminal, take the correct amount on that terminal and wait for approval before choosing Card paid separately in Macarius.
- If using an integrated provider, follow the app's terminal workflow and wait for its final result. Do not retry an uncertain payment without checking its status.
- For a mixed payment, choose Split Payment, add the appropriate amounts and methods, and check the remaining balance. Confirm cash tender/change where requested.
- Complete only after the required amount is covered and all approvals are clear. Then offer a receipt.
Recording external card approval does not itself charge a card. If a terminal declines, loses connection or shows an uncertain result, check it or ask a manager before completing/retrying.
PAYMENTS / TASK 12
Receipts, saved sales and the drawer
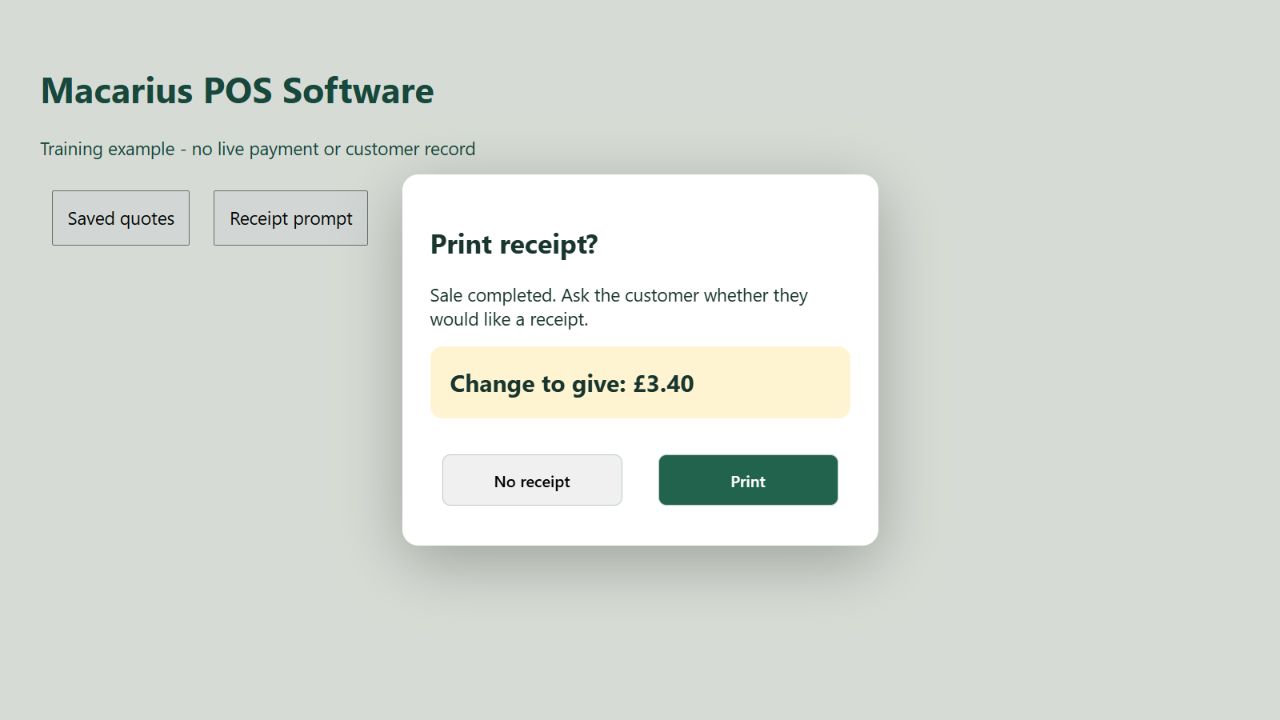
Sample data; unchanged workflows may show an earlier visual style.
- After a successful sale, ask the customer whether they want a receipt. Choose Print or No receipt.
- Use Sales history or Reprint receipt to find a completed sale by the information available. Check the record before reprinting.
- Newly printed receipt barcodes can retrieve the saved sale from the home barcode field. The relevant shop database must contain that sale.
- Use Open till for an authorised manual drawer opening, or Test cash drawer in Printer & scanner. A drawer command is not a sale.
- Check the physical drawer and printout. A command-sent or queued message does not prove the device completed the action.
Receipt reprints do not create another payment. Follow the shop's cash-handling policy; never create artificial sales just to open the drawer.
CASHIER / TASK 13
Hold, recall and delete a held sale
- Choose Hold sale to save an unfinished basket while you serve someone else. Wait for the basket to clear.
- Finish or hold the current basket before choosing Recall sale. Match the held entry by its date, line count and total.
- Select the correct entry and check the restored products before continuing to payment.
- To remove an unwanted held entry, choose Delete held sale and read the confirmation. Confirm only the entry you intend to remove.
- A held sale is not paid. Do not enter its items again if you have already recalled the saved basket.
Deleting a held sale does not refund money or remove a completed sale. Retain records required by your shop's procedures.
QUOTES / TASK 14
Create and save a quote
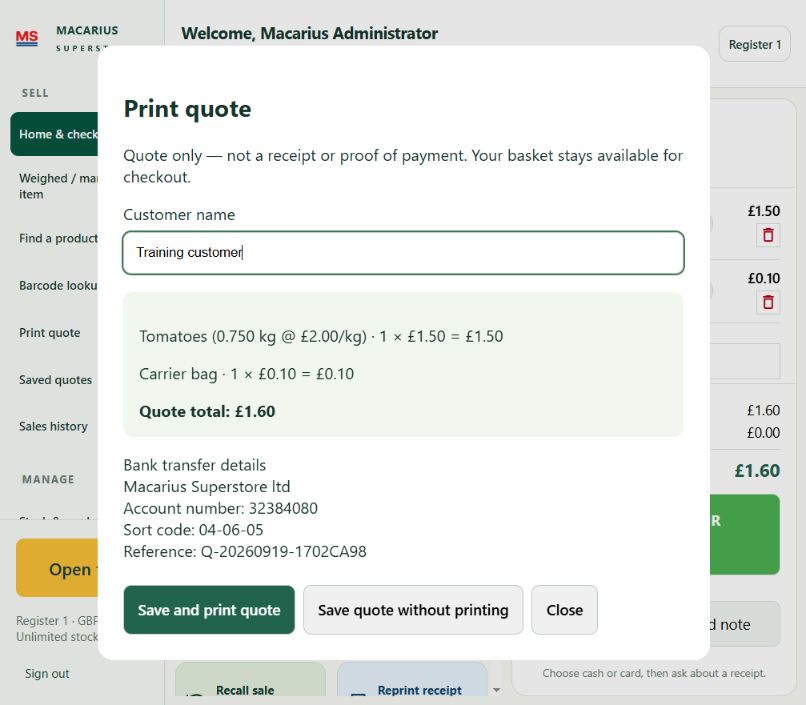
Sample data; unchanged workflows may show an earlier visual style.
- Build the basket with the requested products and quantities, then choose Print quote.
- Enter the customer name and review the items, prices and Quote total.
- Choose Save and print quote, or Save quote without printing. Wait for the saved status.
- Check the reference and the printed document if requested. The quote can include your configured bank/payment details and a retrieval barcode.
- The basket remains available for checkout; saving a quote does not complete a paid till sale.
A quote is an offer or price record, not proof that payment has arrived. Check payment independently before marking it paid.
QUOTES / TASK 15
Manage saved quotes
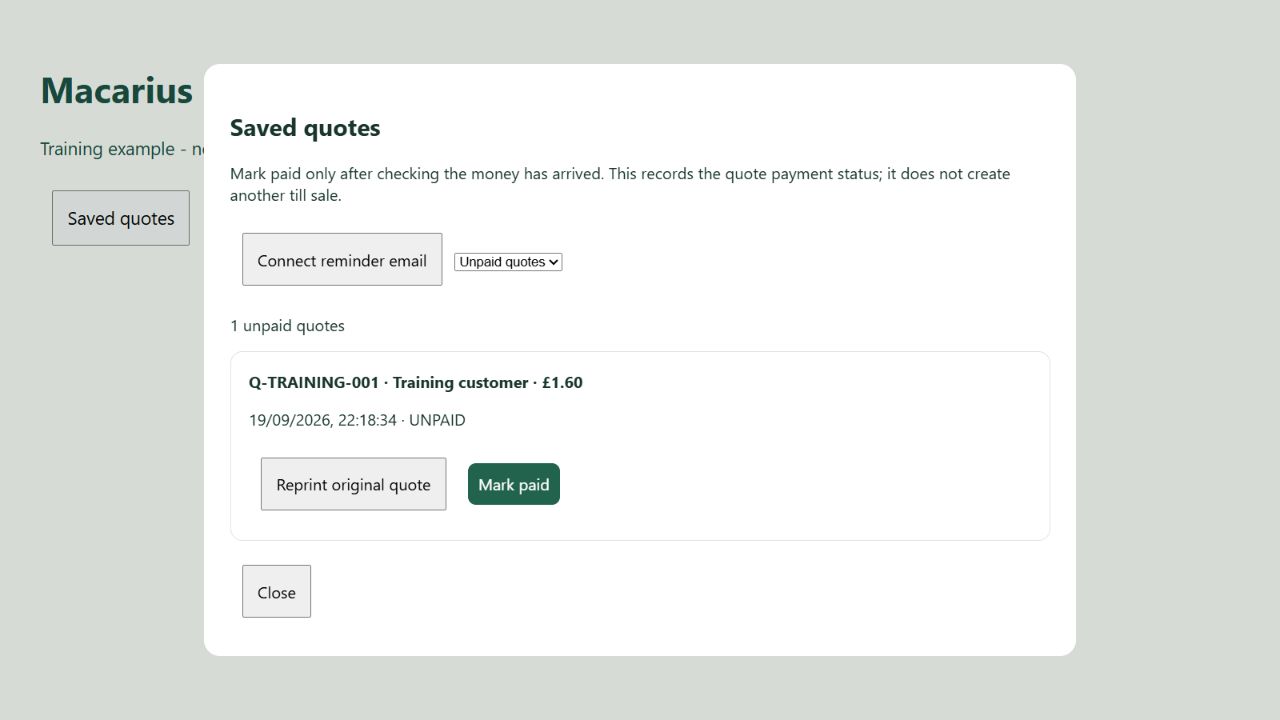
Sample data; unchanged workflows may show an earlier visual style.
- Open Saved quotes and choose Unpaid quotes, Paid quotes or All quotes. Match the reference, customer and amount.
- Use Reprint original quote when another copy is needed. Avoid creating a duplicate merely because the first print failed.
- Before Mark paid, verify the full payment in the bank/provider records. Enter Confirmed by and the reference where available, then use the confirmation control.
- Marking a quote paid updates its quote status; it does not create another till sale. Follow the shop's accounting procedure to avoid double-counting.
- Use the quote's delete control only after reading its confirmation and checking the record. Deletion is separate from a refund.
Quote reminders and email delivery require their configured mail/service setup. Saving a quote alone does not guarantee an email or scheduled reminder.
PRODUCTS & STOCK / TASK 16
Create and maintain products
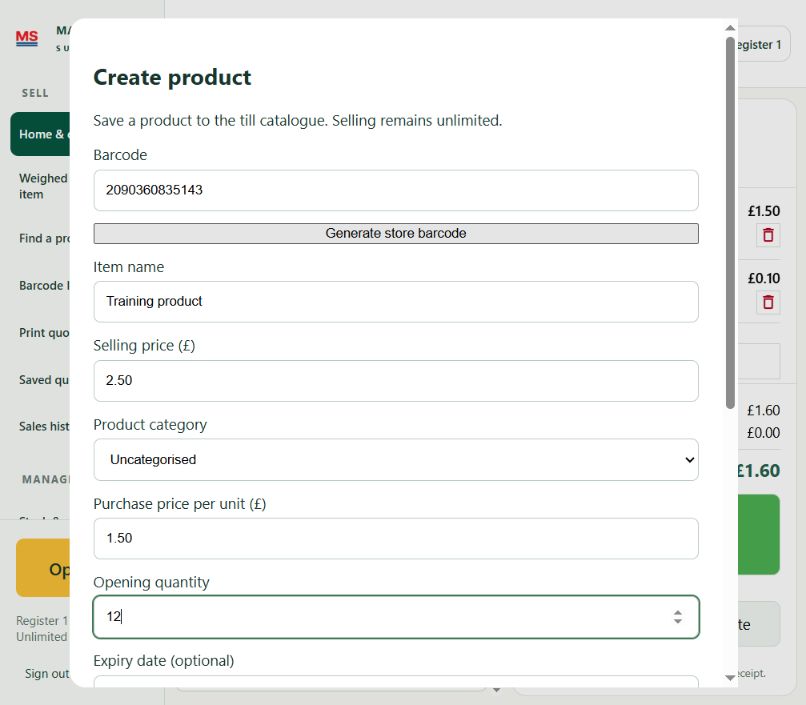
Sample data; unchanged workflows may show an earlier visual style.
- Open Create product. Enter or scan the item's barcode, or generate a store barcode only when the item needs one.
- Enter the item name, selling price and product category. Complete purchase price, opening quantity, supplier, expiry or notes where relevant.
- Use Save product. When creating from an unknown scan, use Save and add to sale if offered and check the basket afterwards.
- Use the catalogue for tracked products and variants. Scan the exact variant where several options exist.
- Keep names, barcodes and costs accurate. Missing cost data limits margin reporting.
Completed local sales deduct known recorded stock once. Unknown quantities remain unknown, and unlimited selling can permit negative quantities. Establish physical opening counts before relying on stock reports. Product VAT marked reference-only does not replace the store tax setting.
PRODUCTS & STOCK / TASK 17
Bulk editing, CSV and shelf labels
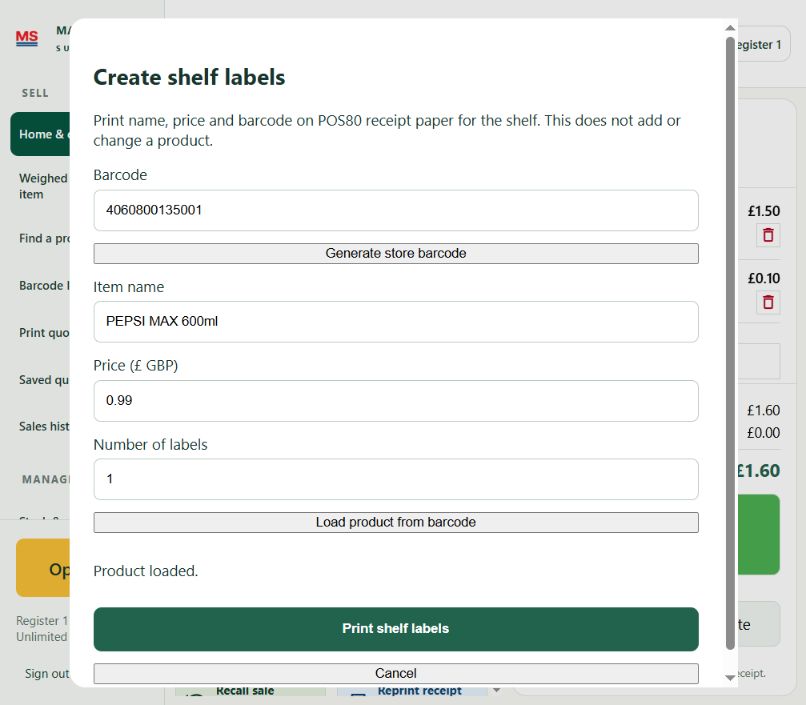
Sample data; unchanged workflows may show an earlier visual style.
- Open Stock & products > Bulk edit / export catalogue. Select the intended products.
- Choose a percentage/fixed selling-price change, supplier or category, enter a reason and preview every change before applying.
- If products changed after the preview, make a fresh preview. Bulk selling-price edits preserve recorded stock quantities and purchase costs.
- Export the complete catalogue CSV when you need all variants for review or migration. Store exports securely.
- For labels, open Shelf labels, load an existing barcode or enter the label information, set the number of labels and print. Check the physical output.
A shelf label does not create or update its catalogue product. Test a small print batch before producing many labels.
HARDWARE & PRESENTATION / TASK 18
Customer display and adverts
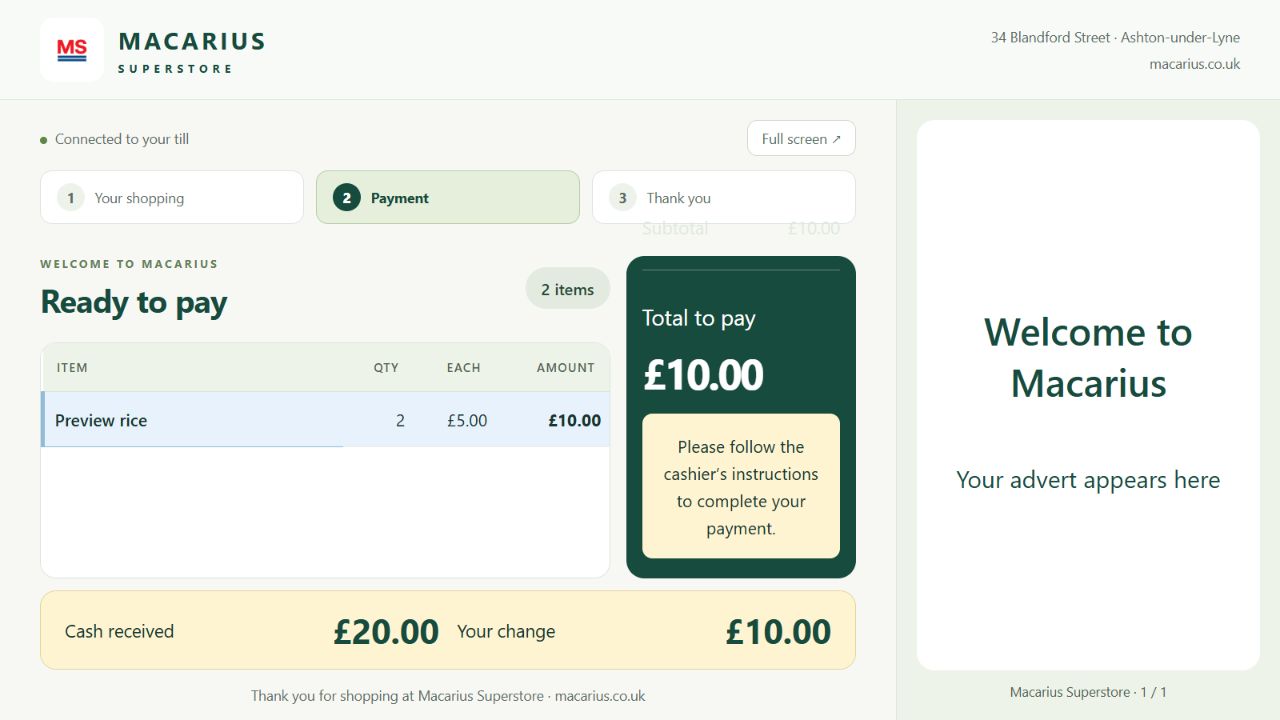
Sample data; unchanged workflows may show an earlier visual style.
- Open Devices & owner tools and use the available Customer display controls. Connect and test a second display where needed.
- Check that customers can see the basket, amount due and cash change during your normal payment flow.
- Administrators/managers can open Customer adverts to upload supported images/videos or add a text slide.
- Set the advertising area, order, timing and visibility of slides, then choose Save changes. Check the customer-facing screen after editing.
- Use fit to keep an image visible in full, or crop only after checking that useful text is not cut off. Advertising videos are silent.
Older screenshots may show the former top-menu entry. The current build moves device and owner tools into the app. Adverts are stored locally; uploading a file and saving a playlist are separate actions.
HARDWARE & PRESENTATION / TASK 19
Printer, scanner and cash drawer setup
- Power on the receipt printer, load paper and install/select the correct Windows printer.
- Open Printer & scanner, choose Refresh printers, select the printer and the appropriate paper width, then Save printer.
- Choose Print test receipt and inspect the paper. Check shop details, text width and barcode readability.
- Use Scanner test to confirm that a product barcode is received correctly and Enter is sent at the end.
- Connect the cash drawer to the supported printer/drawer socket. Check its lock/key position and use Test cash drawer before trading.
Hardware capability depends on the device, driver and connection. A scanner test does not add a product or complete a sale. Never assume a receipt failure means the payment failed.
SETTINGS / TASK 20
Make the homepage work for your staff
- Open Layout & display settings from the left menu. Set scanned-item text size, spacing and Current sale width.
- Choose quick-action and product tile sizes. Hide/show quick actions, the optional catalogue or product photographs as needed.
- Use expanded sale view for more basket space. Save display settings; the choices remain on this computer.
- An administrator can choose Arrange actions & edit fixed-price extras to reorder/hide actions and change the carrier-bag name, price and default quantity.
- Add other fixed-price extras if useful, then confirm Save homepage settings. Restore defaults returns the recommended arrangement. Reload if another administrator changed the settings.
Fixed-price extras are manual sale items and do not track catalogue stock. Editing a future extra price does not rewrite completed sales or existing receipts.
PRODUCTS & STOCK / TASK 21
Offers and promotions
- Open the available offers tools with a manager account. Review the products, quantities, dates and conditions before enabling an offer.
- Test a qualifying basket and a non-qualifying basket. Check the actual line prices and total before trading.
- Review Discounts in Business insights to see recorded discounts. Keep a reason for authorised price changes and voids.
Offer availability depends on configuration and staff permission. Never promise a promotion solely because a shelf label displays it.
PRODUCTS & STOCK / TASK 22
Carry out a stock count
- Open Business operations > Stock counts > Start stock count. Enter Count name and an optional name/barcode filter; leave the filter blank for all variants. Choose Start.
- Enter Physical count for every selected variant. Search name / barcode to find variants beyond the first 150 displayed; entered values remain in the session.
- Choose Save counts, then Review and approve. Check differences against your physical count.
- Choose Apply approved count and confirm Apply counts only when the review is correct. Discard count abandons the count after confirmation.
- If stock changed since the count snapshot, approval is blocked. Recount and review fresh figures rather than forcing an old count.
Stock counts establish or correct recorded quantities. Completed local sales deduct known quantities; unknown quantities remain unknown. Unlimited selling permits quantities below zero. The Business upgrade adds optional pre-payment availability checks under Business operations > Setup & growth > Stock readiness.
PRODUCTS & STOCK / TASK 23
Record stock transfers and wastage
- Set This shop / location name in Business operations > Age checks & location, then Save location name.
- Open Transfers > New stock transfer. Enter From location, To location, product, quantity and reason. For incoming goods, include the Source dispatch ID. Save draft.
- For an outgoing movement, use Dispatch after checking the physical goods. It deducts recorded stock here once. Export dispatch note produces a CSV.
- For incoming goods, check the delivery and use Receive. This adds recorded stock here once. The other shop must record its own receipt.
- Record destination acknowledgement changes the dispatch status only. Use the wastage tools with the correct item, quantity and reason; confirm before reducing recorded stock.
Transfers do not automatically synchronise another installation. Keep dispatch and receipt references together and investigate differences.
PRODUCTS & STOCK / TASK 24
Purchasing and suppliers
- Use Purchasing and the supplier records available to your role to keep supplier and purchase information organised.
- Review product purchase costs and supplier details before relying on purchasing or margin reports.
- Use Business insights > Purchasing & suppliers to review recorded activity. Use Reorder planning as a suggestion list and check actual stock before ordering.
A report does not place an order with a supplier. Follow your shop's receiving and invoice procedure; keep accounting records separately where needed.
CUSTOMERS & STAFF / TASK 25
Customers and loyalty
- Open Customers and search before creating another record. Confirm the correct name and contact information.
- At checkout, choose Add Customer before using customer-specific balances or loyalty features configured for the shop.
- Check any loyalty result and the amount due in the actual basket. Use Customer activity in Business insights for recorded customer activity.
- Limit access to customer exports and use contact information only for the agreed shop purpose.
Loyalty behaviour depends on your configuration. Do not promise points, discounts or marketing messages without checking the actual setup.
CUSTOMERS & STAFF / TASK 26
Issue and redeem gift cards
- Take the customer's payment using the agreed separate payment process first. Open Business operations > Gift cards > Issue paid gift card.
- Enter Recipient, Value and Receipt/payment reference. Choose Review issue, then Payment received — activate only after checking the money was received.
- Keep the gift-card code secure and give it to the intended recipient. Export balances when needed for reconciliation.
- At checkout, use Gift card for the full sale or the supported cash split. Check the remaining balance and complete only once.
Issuing the record does not collect money. Codes work against this installation's records; they are not automatically usable across shops. Gift cards/deposits cannot be combined with an external card charge in this release.
CUSTOMERS & STAFF / TASK 27
Customer deposits and recorded refunds
- After receiving the money separately, open Business operations > Deposits > Record paid deposit. Enter customer name/email, amount, receipt reference and quote/order reference.
- Choose Review deposit, then Payment received — record. This records a liability, not another completed retail sale.
- At checkout, match the correct customer and choose Customer deposit for a full payment or the supported cash split.
- For a deposit refund, return the real money through your approved process first. Enter Amount and Completed refund reference, choose Review refund, then Refund completed — record.
The recorded-refund control does not send money. Check the original transaction and avoid recording the same refund twice. A removed basket line is not a refund.
PAYMENTS / TASK 28
Completed-sale returns: check before refunding
- Find and verify the original completed sale in Sales history. Confirm the item, quantity, original tender and any earlier returns before proceeding.
- Use the authorised returns workflow offered by your installed version. Check the refund amount and restock choice before confirming.
- Gift-card and deposit portions return to their original balances; cash allocation is proportional. Check both the original record and the resulting balances.
- For uncertain card or online refunds, check the provider's status before retrying. Keep the original and refund references.
The exact return launch controls vary by build. Ask a manager if they are unavailable. Cancelling a basket or deleting a held sale cannot reverse a completed payment.
CUSTOMERS & STAFF / TASK 29
Staff accounts, attendance and rota
- Administrators should use Staff accounts to assign individual accounts and appropriate permissions. Test access with the intended role before a shift.
- In Business operations > Staff & rota, use Clock in / Clock out for the signed-in staff member. Ordinary staff use My attendance.
- Managers can choose Add rota shift, select staff, enter start/end and notes, then Save shift. Cancel shift requires confirmation.
- Export attendance CSV for review and use your separate payroll process to calculate wages.
Attendance is not payroll. Staff should use their own PIN; a shared account makes activity harder to attribute.
CUSTOMERS & STAFF / TASK 30
Age-restricted items
- In Business operations > Age checks & location, select the exact product variant and minimum age (16, 18 or 21), then Add age rule.
- At checkout, complete the explicit ID check before payment when a rule applies. Follow the shop's refusal and escalation policy.
- Managers can remove a rule with confirmation when the policy legitimately changes. Review the affected variants afterwards.
The software records a check; it cannot judge a customer's age. Do not store ID photographs or dates of birth in sale notes. Follow your shop's approved age-verification procedure.
REPORTS / TASK 31
Use Business insights and the 21 reports
- Open Reports > Business insights. Choose From / To using UK dates and Run reports. Check the date range before interpreting totals.
- Use search, sorting, paging and filters. Export the filtered CSV, save/print PDF, or open the email composer where offered.
- Sales reports: Sales trends, Hourly sales, Discounts, Voids & price changes, Returns analysis, Card reconciliation and Payout reconciliation.
- Product reports: Profit by product, Profit by category, Stock valuation, Reorder planning, Slow-moving stock, Expiry review, Wastage and Stock adjustments.
- Business reports: Quote ageing, Quote conversion, Purchasing & suppliers, Customer activity, Store credit balances and Data quality.
- For card/payout reconciliation, import the supported GBP CSV using the template, preview and confirm. Duplicates are skipped and conflicting imports are rejected.
Missing costs appear as Unknown. Profit uses saved cost snapshots; stock valuation is current, not a historical balance. Expiry is product/variant level, not batch tracking. CSV reconciliation is not a live bank feed.
CONNECTED SERVICES / TASK 32
Connect accounting with your bookkeeper
- Administrators open Business operations > Accounting. Choose Xero, QuickBooks Online, Sage Accounting or Zoho Books. Each starts disconnected and needs its own provider account and developer/OAuth setup.
- Enter the required client credentials, company/organisation or realm ID and exact callback. Xero supports the local PKCE flow; production Sage/QuickBooks setups require a hosted HTTPS relay.
- Save setup, choose Authorise account in browser, then Verify connection / list accounts. Never share the client secret with staff or include it in support screenshots.
- Agree Till clearing, Sales and Recorded sales tax mappings with your bookkeeper. Save and verify mappings.
- Preview the GBP sales-settlement journals carefully, then explicitly confirm sending. Xero sends draft journals; other providers may post immediately.
- If delivery is uncertain, check the accounting provider before retrying. Review refunds, purchases, fees and liabilities separately.
This is a configured sales-journal connection, not automatic two-way bookkeeping, tax filing or a guarantee of provider availability. Live authorisation and posting must be tested for your own account before use.
CONNECTED SERVICES / TASK 33
Shopify online orders, pickup and refunds
- Configure an existing Shopify connection with the required order/fulfilment permissions. Open Business operations > Online orders > Load online orders.
- Choose View fulfilment / returns for the correct order. The normal view shows the newest 50 orders and orders within the available recent window.
- Record full fulfilment rechecks the order and asks for confirmation. It does not create a local till sale or deduct stock again; this action does not send a shipping notification.
- For collection, choose Mark pickup ready, select the location and confirm Mark ready and notify. Shopify sends the pickup notification. Use Shopify admin for final handover or exchanges.
- To refund supported GBP online payments, choose Review original payment refund, select quantities, Calculate refund preview, then Confirm and issue refund > Issue refund.
- Check the final provider status. Pending is not settled. Use Shopify admin for unsupported orders, more than 100 lines, manual/cash payments, shipping/duties or restocking.
An online refund sends money to the original online payment method. It does not create a local refund, restock goods or send a refund email. Never repeat an uncertain refund without checking Shopify first.
CONNECTED SERVICES / TASK 34
Optional shared shops
- Administrators can review Shared shops in Business operations when available. It requires a hosted HTTPS service, shop credentials and activation.
- Check which snapshot is shared and when it was last updated. Review the destination before uploading or importing information.
- Keep local backups and record physical transfers at both shops using the transfer workflow.
Shared snapshots are not real-time multi-till stock synchronisation. Connected stock and cloud features remain unavailable to purchase. Separate Retail software subscriptions are available through our payment processor private shop billing links.
HEALTH & SAFETY / TASK 35
Set up Health & Safety records
- Open Health & Safety from the available till actions / More actions. Review Policies & safety pack and every TO COMPLETE template for your actual business.
- Use Fridges & freezers > Add fridge/freezer. Enter name, type, location, check interval and safe minimum/maximum temperatures, then Save record.
- Use Checklist tasks > Add task. Enter name, category, interval, owner and instructions, then Save record.
- Review the sections for incidents/actions, training, risk assessments, suppliers, deliveries/traceability, allergens, maintenance, inspections and policies/documents.
- Assign responsible people and check that staff know how to record and escalate problems. Do not publish staff or incident records on the public website.
These are record-keeping tools, not a compliance certificate or professional assessment. Templates need business review and do not automatically update council requirements.
HEALTH & SAFETY / TASK 36
Daily temperatures, checks and corrections
- Choose Log temperature / Record temperature for the correct appliance. Enter the measured reading, time, method and action notes.
- If the reading is outside the configured range, record the corrective action. Investigate the appliance and follow the shop's food-safety procedure.
- Use Complete check for a scheduled checklist task. Record Pass, Fail or N/A, time and useful action notes.
- Correct a record using its edit/archive/restore controls with a reason. Review Change history rather than hiding an error.
- Use Reports & printing or Download temperature PDF. Select From / To, then Download PDF or Email date range where configured.
Measure the actual temperature; the POS does not read a sensor in this workflow. Email preparation does not guarantee delivery without the required mail configuration.
BACKUP & RECOVERY / TASK 37
Configure and verify encrypted backups
- Administrators open Business operations > Backups > Configure encrypted backups. Enter and repeat a recovery passphrase of at least 12 characters.
- Choose interval (1, 6, 12 or 24 hours) and retention (3–365 days). Choose destination and enable, select the folder and wait for the initial verified backup.
- Use an external drive or a securely synchronised folder when appropriate. Macarius writes the file; your separate sync client handles any cloud upload.
- Automatic backups need the app open, signed in and checkout idle. Review the last successful backup, use Backup now before major changes, and Verify a saved backup.
- Keep the passphrase securely outside the till and test recovery on a spare installation. Pause backups only when you understand the gap this creates.
A configured schedule is not proof that a backup ran. Losing the recovery passphrase can make the backup unusable. Backups do not guarantee zero data loss.
BACKUP & RECOVERY / TASK 38
Restore a backup safely
- Finish or hold all baskets and keep the till out of service. Enable backups first so the restore can make a safety copy.
- Choose Restore encrypted backup, select the correct saved file and enter its original recovery passphrase.
- Review the backup date and shop carefully. Save safety copy and restore confirms replacement of the current data; allow the app to restart.
- Check shop details, products, sales, quotes and safety records after restoration. Reconnect credentials and external services as required.
- If the passphrase is wrong or the file is damaged, stop and investigate. Keep the original files and ask for support.
Restore replaces current records. The backup includes supported local records and portable PIN verifiers, but not integration credentials. Never test a restore on the only live copy of your shop.
OWNER REFERENCE / TASK 39
Licensing, support and release checks
Shop administrators open Subscription & billing from the till menu to choose a package, renew or cancel. A reminder starts seven days before saved access expires, with Renew or choose a package and Remind me later.
Billing update, 2 November 2026: Retail subscriptions are available through the till’s Subscription & billing menu. Essential is £11.99/month or £119.92/year; Business is £19.99/month or £199.92/year. Final GBP prices. Open Subscription & billing in the till to review or cancel future collections. Confirmed payments enable or renew the registered till remotely. Downloading alone never authorises collection; the eligible-device trial stays 30 days.
- Keep your licence quote, agreed period, supported device count and renewal details. Ask Macarius to confirm terms before paying.
- Use the owner tools available to your account to review licensing. The website /admin area is for authorised Macarius service administrators, not everyday cashiers.
- Before enabling payments, accounting, online orders or shared shops, test your actual provider account and permissions. Features requiring services are not enabled merely because their menu exists.
Contact sales@macarius.co.uk or +44 161 566 1760 for support. Never send PINs, full card details, private keys or recovery passphrases.
DAILY ROUTINE / TASK 40
Open, trade and close with confidence
- OPEN: sign in with your own PIN; check the correct shop, empty basket, printer paper, scanner, drawer and configured card connection.
- DURING TRADE: check each scan, separate customers' baskets, confirm the total before payment and offer a receipt.
- HANDOVER: finish/cancel payment and hold the unfinished basket before logging out. The next cashier should use their own account.
- CLOSE: review sales/tender reports for the correct dates, compare cash/provider records and record discrepancies using your shop's process.
- Run/check the configured backup and keep its recovery passphrase safely. Close Macarius after dealing with unfinished baskets.
Use the separate one-page Quick start as a daily checklist. Reports and payment records should be checked together; a POS total alone is not bank settlement evidence.
REFERENCE / TASK 41
When something does not work
- SCAN NOT FOUND: refocus the barcode field, check the exact code/variant and use the unknown-item workflow. Do not assume the item was charged.
- PRINTER NOT WORKING: check power/paper/Windows selection, run a test and reprint the saved sale. Do not charge again.
- DRAWER NOT OPENING: check printer power, cable and lock position. Ask a manager; do not create test sales during trading.
- PAYMENT UNCERTAIN: check the provider or terminal status before retrying. Keep the reference and avoid duplicate charges.
- MISSING MENU: check staff permissions and app version. RESTART NEEDED: finish/hold the basket and reopen after updating.
- BACKUP/INTEGRATION ERROR: read the exact error, check configuration and ask the owner. Never paste credentials into screenshots or support messages.
For support: sales@macarius.co.uk, +44 161 566 1760, or the contact section at pos.macarius.co.uk. Include shop name, Windows/app version, steps and a non-sensitive screenshot.